If you are sending bulk or mass emails, then setting up your SPF, DKIM, and DMARC records are non-negotiable.
From Feb 1st 2024, both Google and Yahoo require that:
- All senders have SPF and DKIM set up.
- Bulk senders (more than 5,000 emails/day) must have SPF, DKIM and DMARC email authentication methods set up
Microsoft Outlook also made SPF, DKIM, and DMARC mandatory starting May 2025.
Without these records in place, email service providers will not treat you as a legitimate sender.
As a result, your emails may bounce, land in the spam folder, or in some cases, your mailbox can even get suspended.
In this blog, I will show you how to set up SPF, DKIM, and DMARC correctly, so your emails meet inbox provider requirements in 2026.
Set Up Your SPF, DKIM, and DMARC – TOC
- TL;DR
- How to Set Up Your SPF Record Correctly
- How to Enable and Add DKIM to Your DNS
- How to Create a DMARC Record for Your Domain
- How to Verify if Your SPF, DKIM, and DMARC Record Is Set Up Correctly
- Common SPF, DKIM, and DMARC Setup Mistakes
- Set Up Your Authentication Records And Start Emailing!
- How to Set Up SPF, DKIM, and DMARC: FAQs
TL;DR
If you send emails at scale, SPF, DKIM, and DMARC must be set up correctly.
Here is the quick version.
- You can have only one SPF record, and it supports up to 10 tool checks
- You will usually need multiple DKIM records, one for your email service provider and one for each additional tool that sends emails from your domain.
- DMARC connects SPF and DKIM and tells inboxes what to do if checks fail.
- Always start DMARC in monitoring mode
- Verify everything by sending test emails and checking headers
- All three should show pass before you scale sending
SPF, DKIM, and DMARC examples:
- v=spf1 include:_spf.google.com include:spf.brevo.com include:helpscoutemail.com -all
- v=DKIM1; k=rsa; p=MIGfMA0GCSqGSIb3DQEBAQUAA4GNADCBiQKBgQC9m 5wUIBZHH1o2zJxgZm7hrK29FWyGzH8KqRBYE2QJQZx8F4zy/KHQcY54sAZL JQJx6EvNPOF9+fMjFqQWECQmYAQIDAQAB
- v=DMARC1; p=none; rua=mailto:[email protected]
If SPF, DKIM, and DMARC pass, your emails are trusted and safe to deliver.
Once you have set up your authentication records, you should warm up your email accounts before launching your marketing or outreach campaigns.
How to Set Up Your SPF Record Correctly
SPF stands for Sender Policy Framework.
It is a DNS record that tells email providers which servers are authorized to send emails from your domain.
To set it up correctly, you first need a clear list of all the tools and services that will use your domain to send email.
This usually includes
- Your primary email provider
- Any marketing or cold email tools
- Transactional or notification email services
Once you have this list, you can add each approved sender to a single SPF record in your DNS.
This is what a basic SPF record looks like:
v=spf1 include:approved_sender_1.com include:approved_sender_2.com ~all
This means that you are allowing approved_sender_1 and approved_sender_2 to send emails for your domain.
Here is an actual example of an SPF record with multiple
v=spf1 include:_spf.google.com include:spf.brevo.com include:helpscoutemail.com -all
This setup allows Google Workspace, Brevo, and Help Scout to send emails using the same domain.
Note:
You can have only one SPF record per domain.
SPF also has a limit of 10 DNS lookups, meaning you can add details for only up to 10 sending tools.
If you go beyond this limit, SPF will fail, even if the record looks correct.
How to Enable and Add DKIM to Your DNS
DKIM, or DomainKeys Identified Mail, helps protect your emails by adding an encrypted signature to every message you send.
This signature allows email providers to confirm 2 things.
- The email actually came from your domain.
- The email content was not changed after it was sent.
The DKIM key is generated by your email service provider (e.g., Google Workspace) and by your email sending tool (e.g., Brevo).
This is how a DKIM record usually looks:
v=DKIM1; k=rsa; p=MIGfMA0GCSqGSIb3DQEBAQUAA4GNADCBiQKBgQC9m 5wUIBZHH1o2zJxgZm7hrK29FWyGzH8KqRBYE2QJQZx8F4zy/KHQcY54sAZL JQJx6EvNPOF9+fMjFqQWECQmYAQIDAQAB
You simply have to copy the DKIM record they provide and add it to your domain DNS through your domain provider.
After adding it to your DNS, DKIM usually takes 24 to 48 hours to authenticate.
Note:
You will usually need multiple DKIM records for the same domain.
Each email sending tool creates its own DKIM record with a unique selector.
Just make sure every DKIM record stays in place as long as that tool is sending emails.
How to Create a DMARC Record for Your Domain
DMARC, or Domain-based Message Authentication Reporting and Conformance, is the final layer of email authentication.
It connects SPF and DKIM and tells email providers what to do if something goes wrong.
In simple terms, DMARC lets you decide whether failed emails should be allowed, sent to spam, or blocked.
To add DMARC, you need to create a TXT record in your domain DNS.
You should always start in monitoring mode. This helps you see what is happening without blocking emails.
- Go to your domain DNS settings
- Create a new TXT record
- Set the host name to _dmarc
Now add a basic DMARC value.
v=DMARC1; p=none; rua=mailto:[email protected]
This record tells email providers to monitor your emails and send reports to the email address you provide.
At this stage, no emails are blocked or sent to spam.
Once this is live, DMARC starts collecting data for your domain.
Note:
You can have only one DMARC record per domain.
DMARC should always be added after SPF and DKIM are working correctly.
If SPF or DKIM are broken, DMARC will not work as expected.
Always start with p=none to monitor first. Move to stricter policies only after you are confident that all your sending tools are authenticated.
How to Verify if Your SPF, DKIM, and DMARC Record Is Set Up Correctly?
The easiest way to verify that you have set up your authentication methods correctly is to send a test email to yourself.
If you use multiple tools, send one email from each tool.
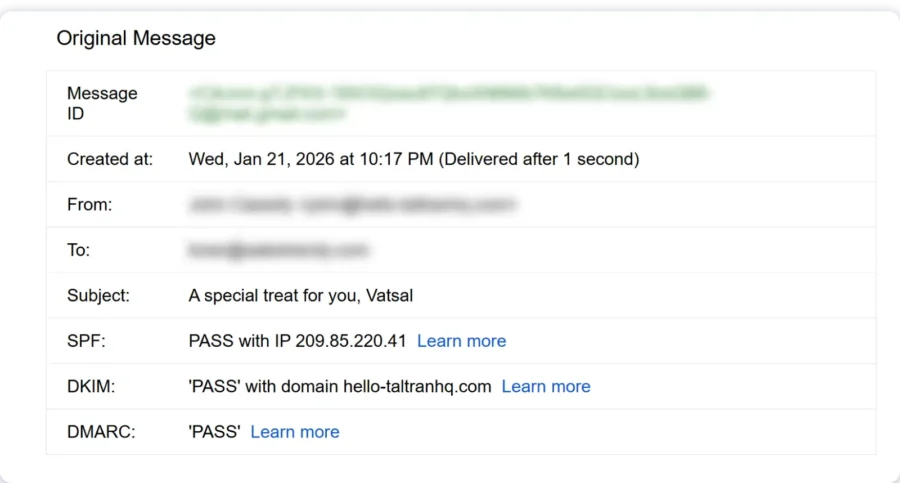
Now open the email and click “Show original” or “View message headers”, depending on your inbox.
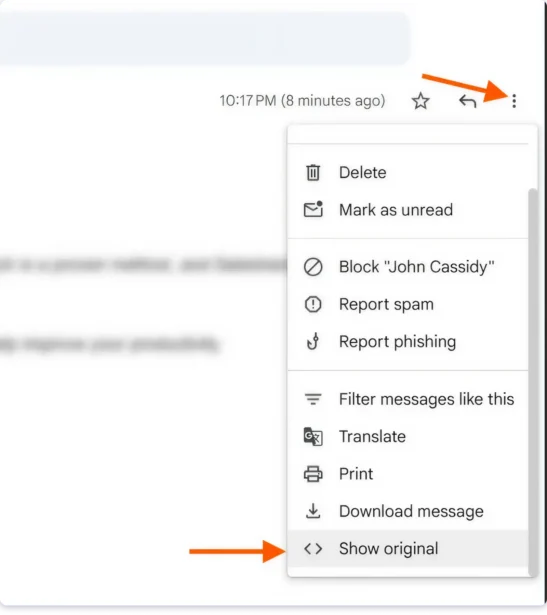
You should look for the authentication results.
- SPF should show pass
- DKIM should show pass
- DMARC should show pass
Common SPF, DKIM, and DMARC Setup Mistakes
Even small mistakes in authentication can hurt deliverability.
These are the most common ones to double-check.
- Adding more than one SPF record to the same domain
- Exceeding the SPF lookup limit by adding too many tools
- Forgetting to update SPF after adding a new sending tool
- Enabling DKIM but not adding the record to DNS
- Deleting DKIM records while a tool is still sending emails
- Setting DMARC to strict mode before monitoring
- Using an invalid or unreachable email address for DMARC reports
- Assuming setup is complete without verifying pass status
Fixing these early prevents inboxing issues later.
Set Up Your Authentication Records And Start Emailing!
I’ve covered everything you need to know about authentication records:
- what they are
- how to set them up
- and how to validate them.
The next step is:
Warming up your email accounts!
Setting up your authentication records does not guarantee your emails will land in your recipients’ inboxes.
To increase your chances of inbox placement, you should warm up your email accounts
Read Next:
Set Up Your Authentication Records And Start Emailing!
I’ve covered everything you need to know about authentication records — what they are, how to set them up, and how to validate them.
Even why you should set them up!
The Next Step?
Go set up your records and start doing what you do best — whether it’s sending marketing campaigns, running sales outreach, or simply making sure your emails reach inboxes.
How to Set Up SPF, DKIM, and DMARC: FAQs
1. What Are the Best Practices for SPF Set Up?
In my experience, the best practices for SPF setup include:
- Avoid the overly permissive “+all” setting, as it authorizes all IP addresses associated with a server to send emails on your behalf
- Regularly audit your SPF settings to remove servers you no longer use
- Only include dedicated IP addresses in the SPF TXT record
- Include “~all” to allow for DMARC authentication to work as intended
2. Can You Create Multiple DKIM Keys for Your Email?
Yes! You can generate as many DKIM keys as allowed by your DNS provider. In my opinion, generating multiple DKIM keys will help you rotate them for increased security.
3. What Is the Best Key Size for DKIM Records?
The best size for DKIM records in 2048-bit keys. In fact, from what I’ve seen, most ISPs and ESPs have switched the practice of maintaining 2048-bit keys for enhanced email protection.
4. What Is the Best Setting for DMARC?
If you’re just starting and don’t have in-depth knowledge, I recommend policy “p=none”. This won’t block or spam your emails. Once you’re confident that everything is set up correctly and your emails are passing authentication, you can adjust the policy to a stricter setting like “p=quarantine” or “p=reject”.