
Google Postmaster Tools is your only free, direct line into how Gmail judges your sending reputation.
Most guides stop at dashboard definitions. This one tells you what to actually do when things break.
I’ve used Postmaster Tools to monitor dozens of domains. Cold outreach domains, warm-up domains, high-volume marketing senders.
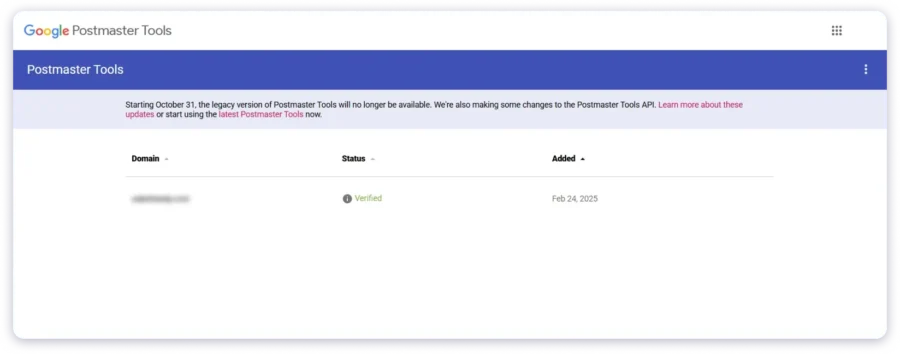
The old V1 interface retired in September 2025.
This guide covers V2 exclusively: no legacy screenshots, no migration steps.
I’ll walk you through setup, explain every metric in plain language, and give you specific troubleshooting steps.
Whether you’re warming up a fresh domain or scaling outreach, this is the guide.
TL;DR – Quick Summary
Google Postmaster Tools is a free tool from Google. It shows you how Gmail evaluates your email sending reputation.
It tracks seven key areas:
- Spam rate – what percentage of recipients mark your emails as spam
- Domain reputation – Google’s overall trust score for your sending domain
- IP reputation – trust score for the IP addresses you send from
- Authentication – whether your SPF, DKIM, and DMARC records pass correctly
- Encryption – percentage of emails sent over TLS-secured connections
- Delivery errors – rejected or failed messages and why
- Compliance status – a V2-exclusive dashboard checking sender guideline adherence
Who needs this?
Anyone sending email to Gmail users. Cold emailers, marketers, transactional senders, etc.
The V1 interface is gone.
Google retired it on September 30, 2025. Everything in this guide reflects V2.
Most guides skip the actionable part. I’ll cover what to do when your domain reputation drops or spam rate spikes, the stuff that actually matters.
What is Google Postmaster Tools?
Google Postmaster Tools is a free diagnostic dashboard built by Google.
It’s a monitoring tool for people who already send email and need to see what happens after they hit send.
What makes it different from third-party tools:
- Postmaster Tools pulls data directly from Gmail’s own infrastructure
- You’re seeing Google’s actual data about your domain, not estimates or samples
- No other free tool gives you this level of access to Gmail’s evaluation of your sending
Google originally built it to help large senders debug deliverability problems.
But it’s become essential for senders of all sizes, including cold emailers and small teams.
A few things Postmaster Tools is not:
- It’s not an inbox placement tester (it won’t tell you which folder your email landed in)
- It’s not a blacklist monitor (it only reflects Gmail’s own systems)
- It’s not real-time (data updates daily with a 24 to 48 hour lag)
Google Postmaster Tools is completely free.
How to Set Up Google Postmaster Tools (V2) – Step by Step
Setup takes under 10 minutes. I verified my domain in about 5 minutes the first time.
Here’s the full walkthrough.
- What You Need Before You Start
- Adding and Verifying Your Domain
- Giving Your Team Access to Postmaster Tools
- How Long Before Data Shows Up?
What You Need Before You Start
Before you touch Postmaster Tools, make sure you have these ready:
- A Google account – Gmail or Google Workspace both work
- DNS access – you’ll need to add a TXT record to your domain
- An actively sending domain – Postmaster Tools only shows data for domains sending to Gmail
- SPF and DKIM configured – authentication should be in place before you start monitoring
If your SPF and DKIM aren’t set up yet, do that first. Postmaster Tools will just show you authentication failures otherwise.
Adding and Verifying Your Domain
Here’s the step-by-step process:
- Go to Google Postmaster Tools
- Sign in with your Google account
- Click the “+” button to add a domain
- Enter your sending domain – this should match your DKIM d= domain or SPF Return-Path domain
- Google generates a TXT record for verification
- Copy that TXT record
Now add it to your DNS. Here’s where to go in the most common registrars:
- Cloudflare – DNS → Records → Add Record → Type: TXT
- GoDaddy – DNS Management → Add → Type: TXT
- Namecheap – Advanced DNS → Add New Record → TXT
Paste the verification string into the value field. Set the host/name to @ (or leave blank, depending on registrar).
Save. Then go back to Postmaster Tools and click Verify.
DNS propagation can take up to 48 hours. In my experience, it usually resolves within 30 minutes.
Quick Note: If you already had V1 verified, your verification carries over. No need to redo anything.
Giving Your Team Access to Postmaster Tools
Postmaster Tools supports multi-user access. But only for verified domains.
To add a team member:
- Open Postmaster Tools and select your verified domain
- Go to domain settings
- Add the team member’s Google account email
They’ll get access – but Google doesn’t auto-notify them, so send them the link yourself
Each team member needs their own Google account.
There’s no role-based permission system. Everyone gets the same view.
How Long Before Data Shows Up?
This is where most people get frustrated. You verify your domain, log in next day, and see nothing.
That’s normal.
Postmaster Tools requires sufficient daily sending volume to Gmail before data populates.
Google doesn’t publish an exact threshold, but from my testing, you need roughly 100+ daily messages to unique Gmail recipients.
A few things to keep in mind:
- Low-volume days may show zero data – Google protects user privacy by suppressing small sample sizes
- Not all dashboards update simultaneously – some lag by 24–48 hours
- If you’re warming up a new domain, expect 1–2 weeks before data appears consistently
This is critical for cold emailers.
If you’re sending 30 emails a day during early warm-up, Postmaster Tools won’t have enough data to display.
Don’t panic. Keep sending, keep building volume, and check back regularly.
Understanding Every Google Postmaster Tools Dashboard
Postmaster Tools V2 has seven dashboards. Each one tells you something different about how Gmail sees your email.
I’ll break down what each metric means, what “good” looks like, and when you should take action.
- Compliance Status Dashboard (V2 Exclusive)
- Spam Rate
- Domain Reputation
- IP Reputation
- Authentication
- Encryption (TLS)
- Delivery Errors
- Feedback Loop
Compliance Status Dashboard
This is new to V2. It’s your quickest health check.
The compliance dashboard checks whether your sending meets Google’s sender guidelines.
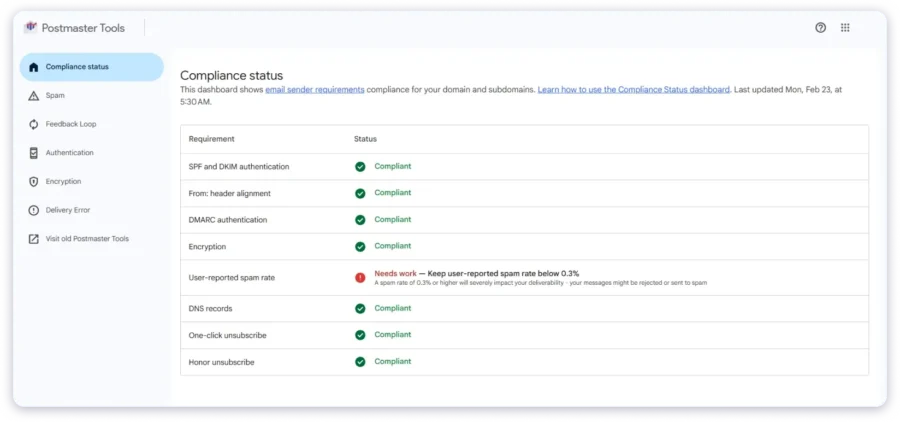
Green means compliant. Anything else needs attention.
What it checks for all senders:
- SPF/DKIM authentication passing
- Valid DNS records
- Proper email formatting
- TLS encryption
- Spam rate within acceptable range
Additional checks for bulk senders (5,000+ emails/day to Gmail):
- DMARC record in place
- One-click unsubscribe header present
- Unsubscribe requests honored promptly
Important Detail: Compliance is assessed at the primary domain level. Not at the subdomain level. Subdomain data rolls up to the parent domain.
If you’re sending from mail.yourdomain.com, Postmaster Tools evaluates yourdomain.com. Keep that in mind when diagnosing issues.
Spam Rate
This is the metric that matters most. Google uses spam rate to decide whether your emails reach the inbox.
How it’s calculated: Emails marked as spam by recipients divided by emails delivered to engaged Gmail inboxes.
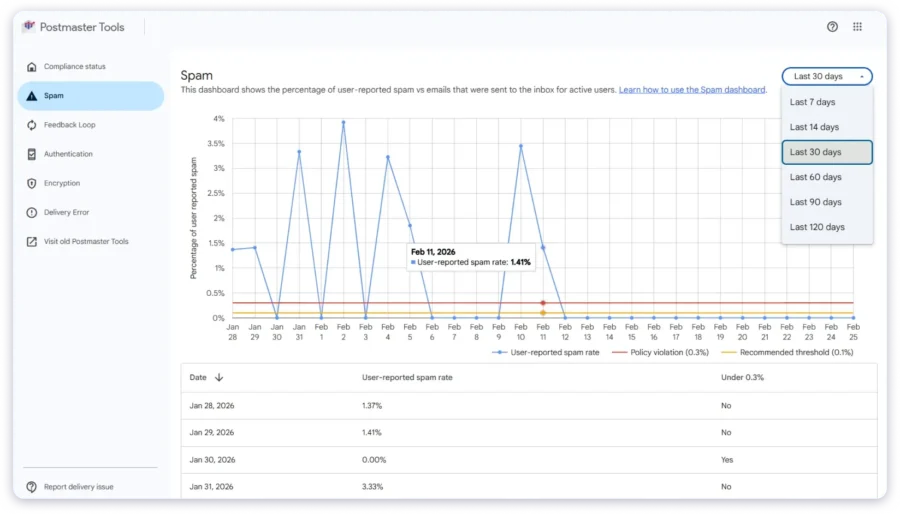
Only DKIM-authenticated messages count.
The thresholds you need to know:
- Under 0.1% – you’re in good shape
- 0.1% – 0.3% – warning zone, take action soon
- Above 0.3% – danger, deliverability penalties likely
A Common Misconception: If Gmail is already filtering your emails to spam automatically, your displayed spam rate may look artificially low.
Fewer inbox deliveries means fewer opportunities for users to manually report spam.
So a low spam rate doesn’t always mean you’re safe. Cross-reference it with domain reputation.
Also Read: How I Stopped My Emails From Going to Spam in 2026
Spikes after a specific campaign usually point to list quality issues. Low-volume days may show no data at all.
Domain Reputation
Google assigns your domain one of four reputation levels.
This is increasingly the metric that determines your deliverability.
The four levels:
- High – very low spam rate, fully compliant, emails rarely filtered. This is where you want to be.
- Medium – mostly legitimate but occasional issues. Emails generally land in inbox, but you’re one bad campaign away from trouble.
- Low – significant spam history. Emails are likely getting filtered or sent to spam.
- Bad – persistent spam signals. Emails almost always rejected or sent to spam.
Domain reputation is more stable than IP reputation. It doesn’t swing wildly day to day.
Also Read: How to Improve Email Reputation
Google has been shifting weight toward domain reputation over IP reputation for years. The V2 changes confirm this trend.
My Take: If you’re at “Medium,” don’t get comfortable. It means you’re on thin ice. Treat it as a warning, not a passing grade.
IP Reputation
Same four levels as domain reputation. But tied to your sending IP addresses instead of your domain.
IP reputation is more volatile. It can shift faster based on short-term sending behavior.
When IP reputation matters most:
- Shared IP users (most ESP customers) – other senders on the same IP affect your reputation
- Dedicated IP users – reputation is entirely your responsibility
- Cold emailers using SMTP services – your IP reputation reflects your sending patterns directly
If you see mixed reputation across IPs – some High, some Low – identify which IPs are problematic.
It usually means one sending source is dragging things down.
Read More: Check Your Email Reputation in 2026: A Step-by-Step Guide
Google is deprioritizing IP reputation in favor of domain reputation. But it still matters, especially on shared infrastructure.
Authentication (SPF, DKIM, DMARC)
This dashboard shows pass rates for your email authentication protocols.
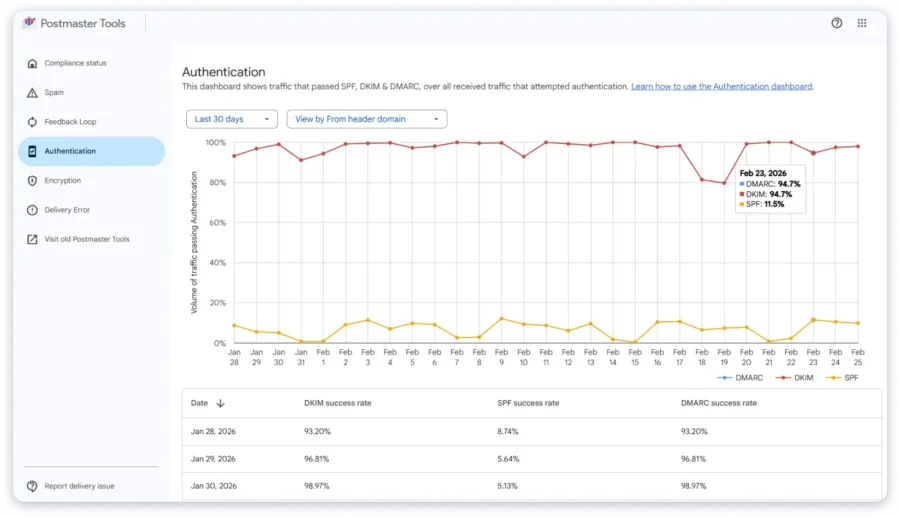
What each metric tracks:
- SPF success rate – percentage of messages passing SPF with From-header alignment
- DKIM success rate – percentage passing DKIM with From-header alignment
- DMARC success rate – percentage passing DMARC alignment (requires a valid DMARC record)
Target: 100% on all three. Anything below means something is misconfigured.
Check Out: How to Set Up Your SPF, DKIM, and DMARC Authentication Records in 2026
Common causes of authentication failures:
- Email forwarding breaking SPF alignment
- Mailing lists modifying headers
- Third-party senders (CRMs, ESPs, warm-up tools) not signing with your DKIM
- Adding a new sending service without updating DNS records
If DKIM drops suddenly, check your DNS records first. Then check whether any third-party service changed their signing configuration.
Encryption (TLS)
This shows the percentage of your emails sent and received over TLS-encrypted connections.
Target: 100% or very close. Most modern email providers and ESPs enforce TLS by default.
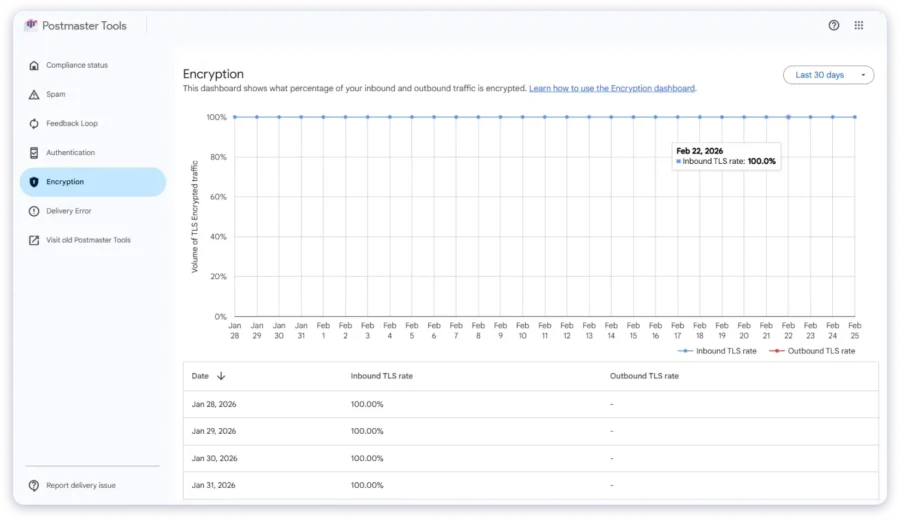
If this drops below 100%, your sending infrastructure likely has a configuration issue. Check your SMTP settings.
This is usually the least problematic dashboard. But if it flags an issue, don’t ignore it – Google factors encryption into sender evaluation.
Delivery Errors
This dashboard shows the percentage of authenticated emails that were rejected or temporarily failed.
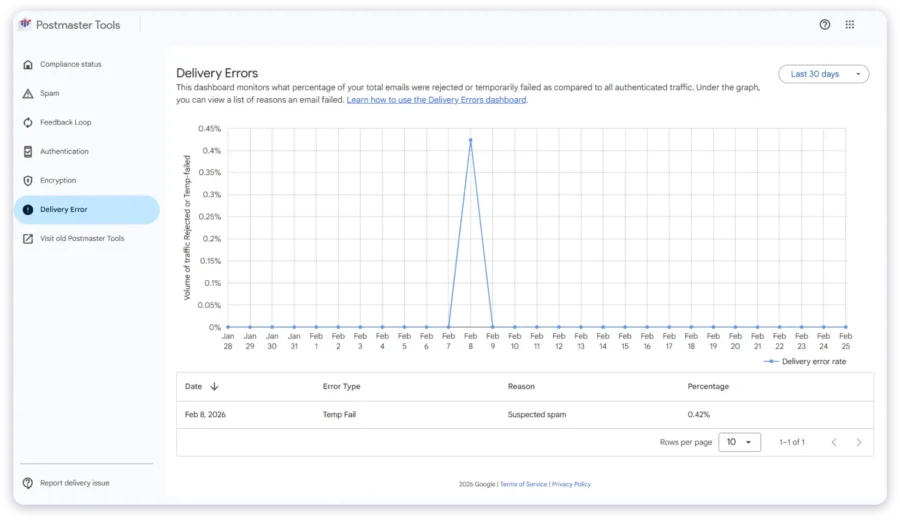
Common error reasons and what they mean:
- Rate limit exceeded – you’re sending too fast, Gmail is throttling you
- Suspected spam – content or sending pattern triggered spam filters
- Low reputation – domain or IP reputation is dragging deliverability down
- DMARC rejection – your DMARC policy is set to reject, and alignment is failing
- RBL listed – your IP is on a real-time blacklist
- Bad PTR record – reverse DNS isn’t set up correctly for your sending IP
If your delivery error dashboard shows higher failure rates than your own sending logs, it could indicate forwarding issues or DKIM replay attacks.
Each error type requires a different fix. I’ll cover the specific actions in the troubleshooting section below.
Feedback Loop
The Feedback Loop (FBL) dashboard shows campaign-level spam complaint data.
Key details:
- Shows average FBL spam rate and identifier volume by day
- Only displays data when complaint rate exceeds 0.5%
- Requires FBL header implementation to get campaign-level granularity
This is most useful for identifying which specific campaigns or audience segments generate the most complaints.
If you’re seeing FBL data, it means your complaint rate is already elevated. Treat it as an alert, not just a data point.
What to Do When Your Metrics Go Wrong?
This is the section most Postmaster Tools guides skip entirely. They tell you what the dashboards show, but never what to do about it.
Here’s the playbook I use when something goes wrong.
- Domain Reputation Dropped
- Spam Rate Spiking Above 0.3%
- Authentication Failures Showing Up
- Delivery Errors Increasing
- No Data Showing Up
Domain Reputation Dropped
A domain reputation drop is serious. But it’s recoverable with the right steps.
Immediate actions:
- Reduce sending volume – cut back by 50% or more immediately
- Pause cold outreach – warm traffic only until reputation stabilizes
- Check your spam rate trend – if it’s spiking, that’s likely the root cause
- Review recent list additions – new contacts from purchased or scraped lists often trigger this
If you’re warming up a domain:
- Slow down the ramp schedule
- Check that warm-up interactions are generating real engagement – opens, replies, spam folder rescues
- If using a warm-up tool, verify your warm-up settings aren’t ramping too aggressively
Recovery timeline: Expect 2–4 weeks of clean, low-volume sending to move from Low back to Medium.
Moving from Bad to High takes longer – sometimes 6–8 weeks.
Patience matters here. Don’t try to “send your way out” of a reputation drop. That makes it worse.
Spam Rate Spiking Above 0.3%
This is a deliverability emergency. Act fast.
Step-by-step response:
- Pause or reduce campaign volume immediately – stop the bleeding
- Identify the trigger – which campaign or list segment launched right before the spike?
- Audit the suspect list – check for purchased contacts, outdated emails, or unengaged recipients
- Review your email content – misleading subject lines and missing unsubscribe links cause complaints
- Run email verification – validate your list through a verification tool before resuming sends
For cold emailers specifically:
- Review your targeting – are you reaching the right people?
- Check personalization quality – generic cold emails get reported more often
- Reduce send frequency per prospect – hitting someone 5 times in a week triggers complaints
Recovery goal: Get below 0.1% before resuming normal volume. Monitor daily until the rate stabilizes.
Authentication Failures Showing Up
Authentication should be 100%. If it’s not, something is misconfigured.
Diagnosis steps:
- Verify DNS records – use MXToolbox or Google Admin Toolbox to check SPF, DKIM, and DMARC
- Check third-party senders – every service sending on your behalf needs to be authorized in your SPF and signing with your DKIM
- Look for recent changes – did you add a new sending service without updating DNS?
- Check DMARC alignment – your From domain must match your DKIM d= domain and SPF Return-Path domain
The most common cause I see: Someone adds a new tool – a CRM, a cold email platform, a warm-up service – and forgets to update their SPF record or configure DKIM signing.
If forwarding is causing SPF failures, that’s expected behavior. You can’t fix it on your end – the forwarding server breaks alignment.
Delivery Errors Increasing
Different errors need different fixes. Here’s the map:
- Rate limit exceeded → Reduce daily volume. Spread sends across more hours.
- Suspected spam → Review content, subject lines, and sending patterns. Reduce volume and improve engagement.
- Low reputation → Follow the domain reputation recovery steps above.
- RBL listed → Check Spamhaus, Barracuda, and other major blacklists. Follow their delisting process.
- Bad PTR record → Contact your hosting provider to configure proper reverse DNS for your sending IP.
If errors spike suddenly without any change on your end, check whether your domain or IP got listed on a blacklist. That’s often the hidden cause.
No Data Showing Up
Empty dashboards are frustrating. But the fix is usually simple.
Common causes and solutions:
- Insufficient volume – you need ~100+ daily messages to unique Gmail recipients. If you’re below this, Postmaster Tools has nothing to display.
- Domain not verified – double-check the verified badge in Postmaster Tools. DNS changes sometimes don’t stick.
- New domain in warm-up – data may take 1–2 weeks to populate consistently. Be patient.
- Dashboard lag – not all dashboards update at the same time. Some data takes 24–48 hours to appear.
If you’ve been sending 200+ emails daily to Gmail for over two weeks and still see nothing, verify your DKIM d= domain matches what you registered in Postmaster Tools.
That mismatch is more common than you’d think.
How Google Postmaster Tools Connects to Email Warm-Up
This is the section nobody else writes. And it’s arguably the most useful if you’re building a new domain’s reputation.
Postmaster Tools is the best free tool to track whether your warm-up is actually working.
Not your warm-up tool’s internal dashboard. Not your open rate metrics.
What Postmaster Tools Should Look Like During a Successful Warm-Up
Here’s the progression I typically see when monitoring a fresh domain through warm-up:
Week 1:
- Little to no data in Postmaster Tools – volume is too low
- This is normal. Don’t worry.
Week 2–3:
- Domain reputation starts appearing – usually at Low or Medium
- Spam rate should be under 0.1%
- Authentication should show 100% from day one (this is a setup issue, not a warm-up issue)
Week 3–4:
- Domain reputation should trend toward Medium or High with clean sending
- Spam rate stays flat and low
- Delivery errors remain minimal
Red flags during warm-up:
- Domain reputation dropping instead of climbing
- Spam rate rising during what should be controlled, clean sending
- Delivery errors appearing early in the warm-up process
- Authentication below 100% – fix your DNS before continuing
If you see red flags, don’t push through. Pause, diagnose, and fix the root cause before resuming.
When I monitored a fresh domain through TrulyInbox’s warm-up over 3 weeks, domain reputation moved from no data → Low → Medium within 18 days.
Spam rate stayed at 0.0% throughout.
That’s what a healthy warm-up looks like in Postmaster Tools.
Google Postmaster Tools Limitations You Should Know
Postmaster Tools is essential. But it’s not perfect. Here’s what it can’t do:
- Gmail only – no visibility into Outlook, Yahoo, or other mailbox providers
- Requires minimum volume – low-volume senders (under ~100 daily Gmail messages) may never see data
- Aggregated data only – you can’t debug individual emails, just overall rates
- No real-time updates – dashboards update daily with a 24–48 hour lag
- No historical data export – you can’t download CSV reports or pull data via API for custom analysis
- Doesn’t identify specific emails – you’ll see your spam rate, but not which emails went to spam
- V2 removed standalone reputation dashboards – IP and domain reputation details now live inside the compliance view, which some users find less granular than V1
For full deliverability visibility, you need complementary tools alongside Postmaster Tools.
Inbox placement testing tools like GlockApps or Inbox Radar show you exactly where emails land – inbox, spam, promotions – across multiple providers.
Postmaster Tools tells you the why behind Gmail-specific behavior. Together, they give you the full picture.
Don’t rely on Postmaster Tools alone.
Use it as your Gmail-specific reputation monitor and pair it with broader testing tools.
FAQs About Google Postmaster Tools
1. Is Google Postmaster Tools Free?
Yes, completely free.
You just need a Google account and a domain you own. No paid tiers, no usage limits.
2. What’s the Minimum Email Volume Needed to See Data?
Google doesn’t publish an exact number. Based on my testing, you need roughly 100+ daily messages to unique Gmail recipients for data to appear consistently.
3. Does Google Postmaster Tools Work for Outlook or Yahoo?
No. Postmaster Tools only covers Gmail and Googlemail accounts.
For Outlook deliverability data, use Microsoft SNDS. For Yahoo, check their complaint feedback loop program.
4. How Often Does Google Postmaster Tools Data Update?
Daily, with a 24–48 hour lag.
You’re always looking at yesterday’s or the day before’s data. Not real-time.
5. Can I Use Google Postmaster Tools to Monitor Email Warm-Up Progress?
Yes – and I’d argue it’s essential.
Postmaster Tools shows domain reputation changes and spam rate trends over time.
That’s exactly what you need to know whether your warm-up is working.
6. What Happened to the Old Google Postmaster Tools Interface?
Google retired the V1 interface on September 30, 2025.
All users are now on V2, which includes a new compliance dashboard and updated reporting.
7. What’s a Good Spam Rate in Google Postmaster Tools?
Google recommends staying below 0.1%.
Anything above 0.3% consistently puts you at risk of deliverability penalties. If you’re at 0.0%, you’re in great shape.

 Vatsal Shah
