If your email campaigns aren’t giving you the results you expected, and you’ve narrowed it down to one question: “Could I be blacklisted?”
You are in the right place for the right reasons!
In this blog, I will show you how to check if your domain or IP is blacklisted, how to get delisted, and how to prevent it from happening again.
Moreover, I will share the tools I use to monitor blacklist, inbox placement, and improve my deliverability.
Keep reading to know if you are blacklisted and how to get out of it.
Email Blacklist Check – TOC
What Is an Email Blacklist?
A blacklist is a list of
- domains
- email addresses
- or IP addresses
that have been flagged for sending spam or engaging in suspicious email activity.
If you end up on a blacklist, your emails will not get delivered to your recipients’ inboxes.
There are many reasons why your email could end up on a blacklist.
Here are some of the reasons:
- Sending too many emails to invalid or non-existent addresses
- High spam complaints from recipients marking your emails as spam
- Not properly authenticating your email domain (SPF, DKIM, DMARC issues)
- Sudden spikes in email volume that raise red flags
If you want to know more, check out my Complete Guide on Email Blacklist.
How to Check if Your Emails Are Blacklisted?
I will take you through the exact process I follow whenever my email performance drops and I suspect a blacklist issue.
There are only three checks you really need to run.
They are simple, fast, and accurate:
1. Run an Inbox Placement Test
The first thing I do (and you should too) if my email performance drops is run an inbox placement test.
It shows you exactly where your emails land:
- Inbox
- Promotions
- Spam
- or undelivered.
This way, you can rule out other deliverability issues.
For example:
- If your emails land in the Inbox or Promotions, then your domain is healthy and not blacklisted.
- But if they land in Spam or fail to deliver, then you likely have a blacklist or reputation problem that needs immediate attention.
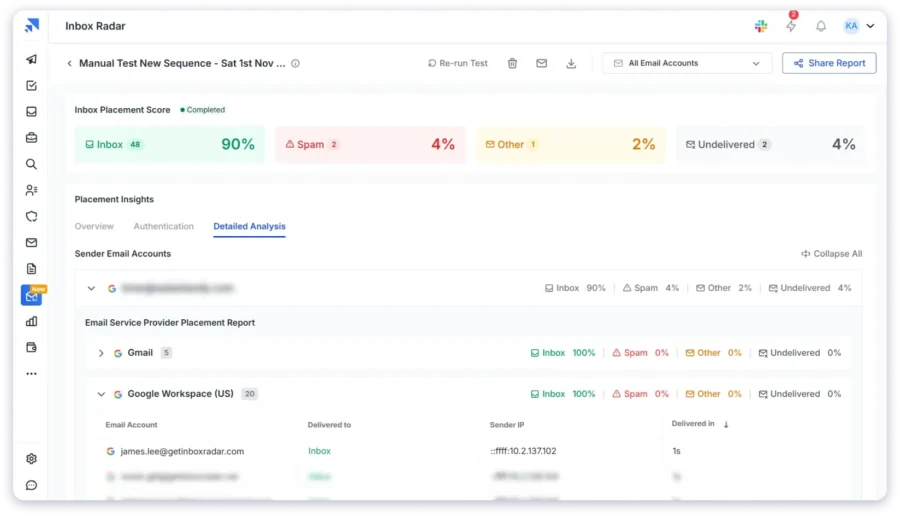
I use a tool like Inbox Radar to check the placement rates of my sending accounts.
It also has blacklist monitoring, so that’s a huge bonus.
The moment you connect your email accounts to Inbox Radar, it checks your authentication records and automatically scans known blacklists.
I recommend you take the free test to see how it can help you and your team.
2. Use a Blacklist Checker Tool
This method is the best approach if you know for sure you are blacklisted.
You can directly check on blacklist databases or use a tool that scans multiple lists for you.
All you have to do is enter your domain or server IP.
The tool will show whether you are marked as Clean or Listed.
Some of the popular tools:
- MxToolbox
- Spamhaus
- DNSChecker
Here is how you can use them:
- Visit any blacklist checker/database. Here, I will show you with MxToolbox.
- Enter your domain or server IP under MxToolbox’s blacklists tab and hit Blacklist Check.
- In a few seconds, MxToolbox will show you a list of blacklists and whether your domain or IP is marked as Clean or Listed on any of them.
The downside is finding a tool that lets you check multiple blacklists across all the email accounts, domains, and server IPs you manage.
And doing all of that at an affordable price is even harder.
But I’ve already done the heavy lifting for you by testing multiple platforms myself.
You can check the best ones here:
3. Look at SMTP Error Codes
Another reliable way to confirm if you are blacklisted is to check your SMTP error codes.
Whenever an email fails to deliver, your email provider returns an SMTP response.
These codes can quickly tell you whether the problem is related to a blacklist, authentication, or a reputation issue.
For example:
- 550 5.7.1 → Blocked due to spam or blacklist
- 554 5.7.1 → Message rejected by the receiving server
- 421 4.7.0 → Temporary block due to poor reputation
- 5.7.26 → DMARC or authentication-related block
If you see these errors consistently across providers like Gmail, Outlook, or Yahoo, it’s a strong sign that:
- Your domain or IP is blacklisted
- Your sender reputation has dropped
- Your authentication records are misconfigured
This method is more technical.
But it gives you direct clues about what is going wrong and whether a blacklist is involved.
How to Delist Your Emails, IPs, and Domains From a Blacklist?
You now know how to check if your emails, domain, or IPs are blacklisted.
The next step is fixing it.
Delisting is not difficult, but you need to follow the right process.
Different blacklists have different rules, and some respond faster than others.
Here is the exact process I follow whenever I need to get a domain or IP delisted:
- Identify Which Blacklist You Are On
- Check the Reason for Listing
- Fix the Issue (Spam Traps, Complaints, DNS, etc)
- Submit a Delisting Request
- Re-Test Your Inbox Placement
1. Identify Which Blacklist You Are On
The first step is to find all the blacklist databases you are listed on.
This is because each blacklist has different rules, forms, and delisting requirements.
The previous steps I shared:
- Run an Inbox Placement Test
- Use a Blacklist Checker Tool
will help you figure out which blacklist database you are listed on.
Once you know the exact blacklist, you can move to the next step and fix the issue properly.
2. Check the Reason for Listing
After you know which blacklist or blacklists you are on, the next step is to find out why you were listed.
Most blacklists share the reason.
Some common reasons include:
- Sending emails to invalid or non-existent addresses
- Hitting spam traps
- High spam complaints
- Sudden spikes in email volume
- Poor list hygiene
- Missing or incorrect SPF, DKIM, or DMARC
- Sending from an IP with a bad reputation
Once you know the reason, you can fix the issue properly before submitting a delisting request.
3. Fix the Issue
Do not request delisting until you fix the root cause!
If you skip this step, you will get blacklisted again, sometimes within hours.
Here are the fixes you should apply based on the reason for listing:
- If you hit spam traps:
Remove old data, scraped lists, and unverified contacts. - If you sent to invalid emails:
Clean your list and use verified B2B data only. - If you got high spam complaints:
Improve your content, reduce frequency, and stop cold sending temporarily. - If authentication failed:
Set up SPF, DKIM, and DMARC correctly. - If your sending volume spiked:
Reduce the volume and warm up again. - If reputation dropped:
Pause sending and warm up your accounts slowly.
Fixing the issue first increases your chances of getting delisted quickly and staying clean long term.
4. Submit a Delisting Request
Once you fix the issue, you can request removal from the blacklist.
Each blacklist has its own delisting page or form.
Some remove you automatically, while others require a manual request.
Here’s what usually happens:
- Spamhaus:
You fill out a simple form explaining the issue and what you fixed. - SpamCop:
Delists automatically after a cooldown if the problem stops. - Barracuda:
Requires a manual request through their removal form.
SURBL and others:
Ask for a short explanation and a review request.
When submitting your request:
- Be clear and honest
- Mention the cause you fixed
- Keep it short and simple
- Avoid over explaining
Most blacklists respond within 24 to 72 hours.
5. Re-Test Your Inbox Placement
After the blacklist removes your domain or IP, you should always re-test your inbox placement.
This confirms whether:
- Your emails are reaching the inbox
- Your sending reputation has recovered
- Gmail, Outlook, and Yahoo are accepting your messages
- No new blacklist flags appear
- Your authentication records are working correctly
I usually run another inbox placement test using Inbox Radar to double-check everything.
It shows me my updated placement rates and alerts me if any blacklist issue comes back.
This final step ensures your domain is clean, safe, and ready for sending again.
Keep Out of Blacklists
Now you know how to check if you are blacklisted, how to get delisted, and how to fix the root cause.
The next step is staying out of blacklists for good.
From my experience, here’s what you should focus on:
- Keep your data clean
- Warm up new accounts slowly
- Authenticate every domain you send from
- Avoid sending to risky or unverified contacts
- Monitor your domain health regularly
I use Inbox Radar for this because it monitors blacklist status, inbox placement, and DNS health in one place.
It helps me catch problems early before they turn into full deliverability issues.
If you want your sending to stay clean and consistent, set up a monitoring routine.
It will save you a lot of time and prevent last-minute delivery drops.
Staying off blacklists is simple when you track the right things and act early.
Email Blacklists – FAQs
1. How Do I Check an Email’s Reputation?
You can check your email’s reputation using tools like Google Postmaster Tools, Microsoft SNDS, or an inbox placement test.
These tools show spam rates, domain health, and how mailbox providers treat your emails.
2. How Long Does It Take for an Email Address to Be Removed From a Blacklist?
It depends on the blacklist.
Some remove you within hours. Others take 24 to 72 hours.
A few require manual review and can take longer if the issue is serious.
3. What’s the Difference Between a Spam Trap and a Blacklist?
A spam trap is an email address used to catch senders with poor list hygiene.
A blacklist is a database that blocks or restricts senders with spam-like behavior.
Hitting spam traps often leads to blacklisting.
4. Can an Email Address Be Blacklisted Permanently?
Yes, in many cases.
If the address repeatedly triggers spam traps or violates sending guidelines, some blacklists may refuse removal.
Some blacklists allow delisting once the issue is fixed.
5. Are There Tools That Monitor Email Reputation Automatically?
Yes.
Tools like Inbox Radar track blacklist status, inbox placement, DNS health, and reputation signals automatically.
They alert you instantly if something goes wrong.

 Vatsal Shah